Jeffrey Gibson
Creature Comforts
No Need to Hibernate!
Thank you for purchasing our Creature Comforts Park Pack. Inspired by nature, the Conservancy has filled this pack with Cuyahoga Creature Comforts—games, activities and inspiration for the human animal. We hope this helps to curb your cabin fever! Use this webpage to download stencils, watch how-to videos and discover other resources to create your masterpieces.
Stencils
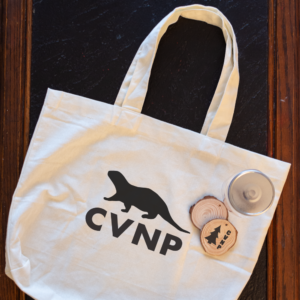
Download our custom CVNP Otter and Pine Tree stencils to decorate your tote bag, mason jar, tree cookies and anything else that could use a little extra CVNP! Simply click the image below to access the downloadable files.
Mason Jar Crafts
The Mason Jar included in your Creature Comforts Park Pack may seem a little out of place at first, but the truth is, it’s full of endless creative possibilities. You can fill it with a delicious salad with a recipe from our friends at Countryside, you could give it as a gift to and fill it with fun activities to do together, you could turn it into a lantern or a terrarium… the list goes on and on. Below you’ll find links to some projects we found especially inspiring as well as a few step-by-step instructions.
Snow globe: A calming sensory activity, this website has step-by-step instructions on how to turn your mason jar into a gorgeous snow globe: https://www.firefliesandmudpies.com/glitter-timers/
Terrarium: We love this idea to connect with nature a little more at home: https://dengarden.com/gardening/How-to-Make-a-Terrarium-in-a-Jar
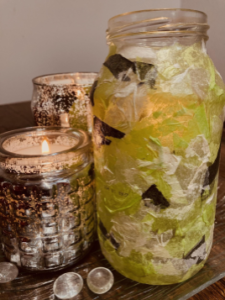
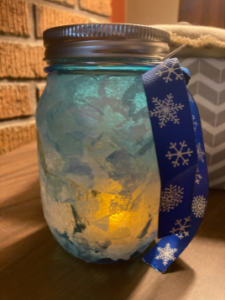
Candleholder or Lantern Step-by-Step Guide
Materials needed:
-your mason jar
-3-4 pieces of tissue paper, in a variety of colors
-decoupage, such as Mod Podge in matte
-a sponge brush
To make this into a lantern
-a battery operated tea light, or LED string lights
-low gauge craft wire
-ribbon
Steps:
- Make sure your mason jar is clean and dry
- Choose your color scheme, or go with random colors for a stained glass effect. Try to keep the shade and contrast consistent. Dark colors tend to let in less light, and light colors show up as more transparent. Mixing light and dark colors will create a spotting effect.
- You can cut your paper into squares (a good step to do ahead of time if doing this project with younger kids), or rip it with your fingers. Size wise, you want postage stamp size or smaller.
- Start at the top of the jar and work your way all the way around and then down. That way, you can hold the jar if you need to, and take a break to let the jar dry when you’re about halfway down so you can hold the top as you work on the bottom.
- For each piece of paper, make a small dot of mod podge on the jar and place your paper. When you are happy with the position, sponge over the paper with more mod podge until the paper is flat on the jar. Repeat with more paper, always overlapping with other pieces and not leaving empty space.
- When the top half is complete, let dry for at least 1 hour. Then, begin the bottom half. You may fill in with more paper pieces where needed. When the jar is completely covered, let dry.
- When done, use a tea light—or perhaps a strand of led lights—to light up your creation. It is recommended to use a battery operated tea light in this craft for safety and to protect the jar from melting wax. Always use caution if using anything burning—supervise use and extinguish when finished.
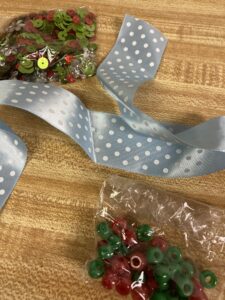
Found Objects Jar
Materials needed:
- Your mason jar
- 15-20 objects of your choice—-more or less depending on size. You will need enough to fill the jar at least to the inside rim
Optional:
- Added decorative elements, such as ribbon, sequins, buttons, or a printed quote, paint—recommended spray paint or acrylic
Steps:
- Collect interesting natural or small man-made objects. Some examples could be beach glass , LEGO pieces, eye-catching rocks or seashells. In our example, we used acorns.
Note: about ethics of collecting. Please do not collect objects from places where it prohibited, such as private property or National public lands. Try looking about your yard or neighborhood. Check local ordinances when in doubt. Many objects are available from quality purveyors, either ethically sourced or synthetically produced. Try thrift shops or hardware stores, too. There is inspiration everywhere! - Before filling your jar, you may choose to add some decorative touches. We have chosen a length of ribbon cut to the diameter of the jar. It is helpful to use ribbon with wire inside the seam to help hold it in place. We’ve also found a quote that pertains to the object, and the story we want to tell with them.
- Arrange your objects in the mason jar. For some creative flair, you may choose to use monochromatic pieces, or paint your objects a uniform color. Here, we have painted our acorns a dusty metallic rose gold.
- You may then choose to cap your jar. You can use hot glue to secure the lid to make a permanent fixture. Or leave the top open, and you can change it up in the future.
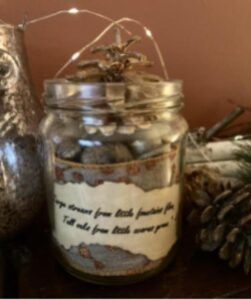
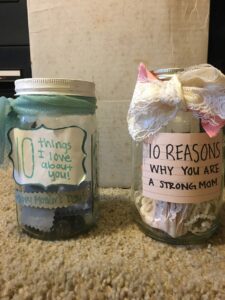
Quote Jar
Materials needed:
- Your mason jar
- Decorative elements such as sequins, lace, construction paper or ribbons
- Paper cut into strips with your quotes or messages written or printed on them
Steps:
- Collect some quotes that are meaningful to you; print in two columns so that when the final piece will be fortune-cookie sized.
- Cut out your quotes and arrange them in your jar.
- Randomly select one each day to feed your mind and spirit. Or, hand-write reasons why you love someone decorate the jar for a meaningful gift.
Mason Jar Recipes
Create a healthy and delicious meal using your mason jar. Our friends at Countryside have collaborated with us to share their inspiration with you. Countryside is a nonprofit organization working in partnership with Cuyahoga Valley National Park to protect and preserve the rural landscape of the park. Beyond preserving farmland, they educate new farmers through their New Farmer Academy intern program, work to make healthy and fresh food accessible to everyone, and facilitate farmers’ markets. They are currently operating Countryside Curbside Farmers’ Market at Old Trail School, a preorder and curbside pickup farmers’ market that allows market shoppers to support their favorite local farmers and food producers in the safest way possible.
Learn more about Countryside and find many more recipes featuring seasonal ingredients by visiting https://countrysidefoodandfarms.org/
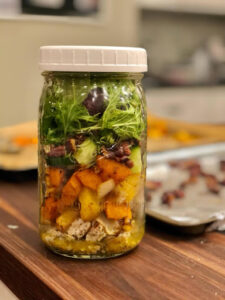
Photo: Countryside
Winter Squash Salad in a Mason Jar
Servings: 4
Recipe Description: Do you find it challenging to eat fresh and healthy food during the winter months? You’re not alone, but it doesn’t have to be challenging! This nifty recipe allows you to prep flavorful and comforting winter salads for the week ahead. The best part about this salad is how satisfyingly all of the ingredients just fall into the bowl when you dump the jar!
Ingredients:
- 2 cups butternut squash*,cut into ¼ inch cubes
- 1 small onion*, diced
- 1 cup pecans
- 3 Tbsp. salad dressing* of choice
- 4 cups cooked chicken, shredded (roughly 4 chicken breasts or 2 lbs.)
- 8 cups spinach*
- 3 Tbsp. olive oil, divided
- Salt and pepper to taste
- 4 – 32 oz. mason jars
*Available for purchase from local producers through Countryside Curbside Farmers’ Market at Old Trail School
Directions:
Preheat your oven to 400° F. Grease or line a baking sheet with parchment paper.
In a medium bowl, combine cubed squash, diced onion, 2 Tbsp. of oil, and desired amount of salt & pepper. Toss until squash and onion are well coated. Spread the mixture evenly on the baking sheet and roast in the oven for 20 minutes, removing and stirring halfway through.
While squash is roasting, line a small baking sheet with parchment paper and toss pecans, 1 Tbsp. of olive oil, and desired salt in a small bowl until pecans are coated. Spread pecans evenly on the lined baking sheet and place in the 400° oven once the squash comes out. Roast pecans for 2 minutes, watching closely as they can burn easily.
Once pecans and squash have completely cooled, it’s time to pack the jars. In each of the 4 mason jars assemble ingredients from bottom to top in the following order: dressing, shredded chicken, squash and onion mixture, toasted pecans, spinach. Tightly seal each jar and store in the refrigerator for up to 5 days. When you’re ready to enjoy, simply dump the jar into a bowl!
Note: This recipe can be altered to include your favorite salad ingredients. Just stick to the general guideline of filling the jar bottom to top as follows: dressing, protein, vegetables, cheese (if using), grains (if using), nuts or seeds, lettuce.
Apple Pie Overnight Oats in a Mason Jar
Servings: 1
Recipe Description: You can never go wrong with some creamy oatmeal on a lazy winter morning. All the prep work for this lavish breakfast happens at night so you can just wake up and effortlessly enjoy the delicious flavors of apple and cinnamon.
Ingredients:
- 1 small apple*, cut into ⅛ inch cubes
- 1 Tbsp. maple syrup*, divided (or honey*)
- 1 tsp. coconut oil (or oil of choice)
- ½ cup rolled oats*
- ¼ – ½ cup milk of choice
- ¼ cup greek yogurt (or yogurt of choice)
- ½ tsp. vanilla extract
- ½ tsp. + a sprinkle of cinnamon
- 1 – 16 oz. mason jar
- Optional Toppings: nut butter*, seeds, or whatever your heart desires
*Available for purchase from local producers through Countryside Curbside Farmers’ Market at Old Trail School
Directions:
In a small sauté pan, heat oil over medium heat. Add ¾ of your diced apple and cook until tender, 7-10 minutes. Remove from heat and stir in 1 tsp. of maple syrup and a sprinkle of cinnamon; set aside and allow to cool. Save the remaining ¼ of diced apples to top oats in the morning. (Pro tip: apples can be tossed in 1 tsp. of lemon juice to keep them from browning.)
In the mason jar, add oats, milk, yogurt, vanilla extract, ½ tsp. Cinnamon, and cooled sautéed apples. Stir until everything is combined, tightly seal the jar and place in the refrigerator overnight.
In the morning, top oats with leftover apples and any other desired toppings before digging in.
Note: Overnight oats can be stored in the refrigerator for up to 5 days.
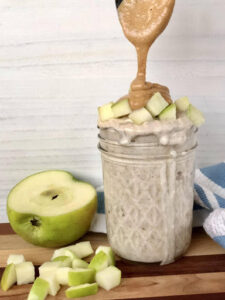
Photo: Countryside
Contact Us
Tel 330.657.2909
Fax 330.657.2328
1403 West Hines Hill Road
Peninsula, Ohio 44264

Charity Navigator is America’s premier independent charity evaluator. Click on the logo to review our four star rating.
![]()

Visit Our National Park
Corporate Partners
![]()

© 2025 Conservancy for Cuyahoga Valley National Park